Very easy to solo with a level 90 toon in DOV gear. My SK sprints through this whole zone in about 7 or 8 minutes! My coercer can even solo this zone pretty quickly. A great zone to solo once a day per toon to farm the plat chest from the bouncy mob (about 10 plat on average), level 80 masters from the boss mob, and shineys to sell on the broker.
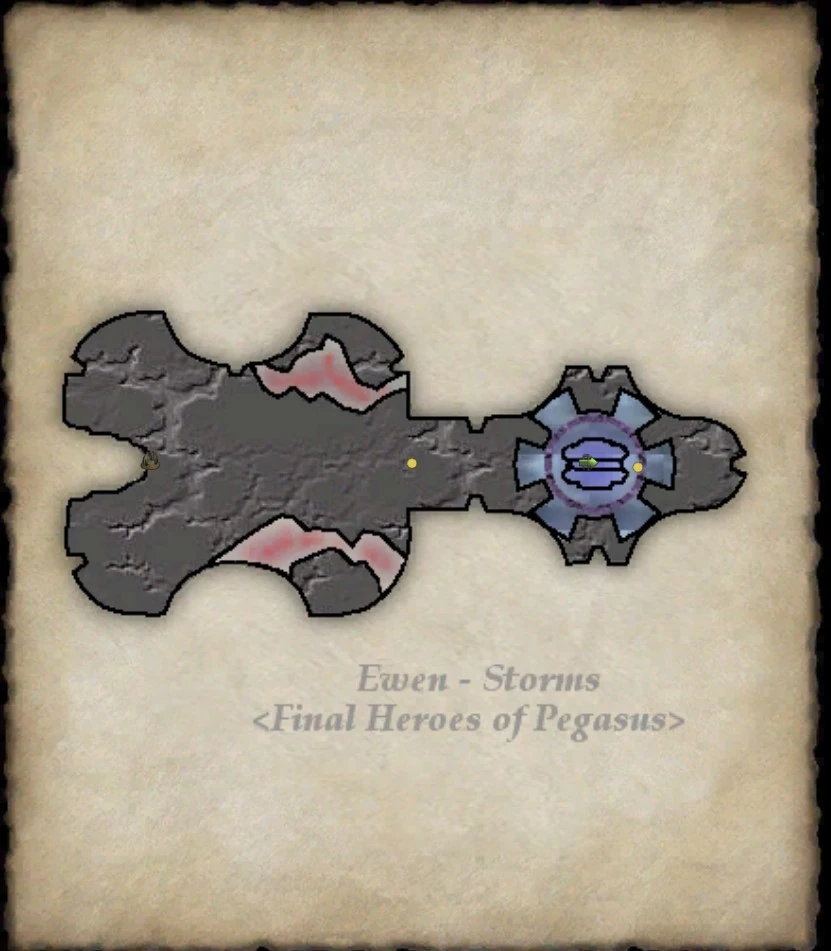
The first room[]
This is a standard zone filled with heroics which you simply have to clear to open up the teleport to the second area.
Avoid getting too close to the non-agro named mob while clearing the trash mobs. If you get to close to the named, he will hit you with a nasty spell for a lot of damage and a knockback. If you get this damage and knockback while pulling trash mobs, it could very well mean a wipe. Also try to tank the trash mobs with back against the walls of the room, as a lot of the trash mobs have a knockback. There are pits in the room that will kill you, if you're knocked into them and fall through the floor.
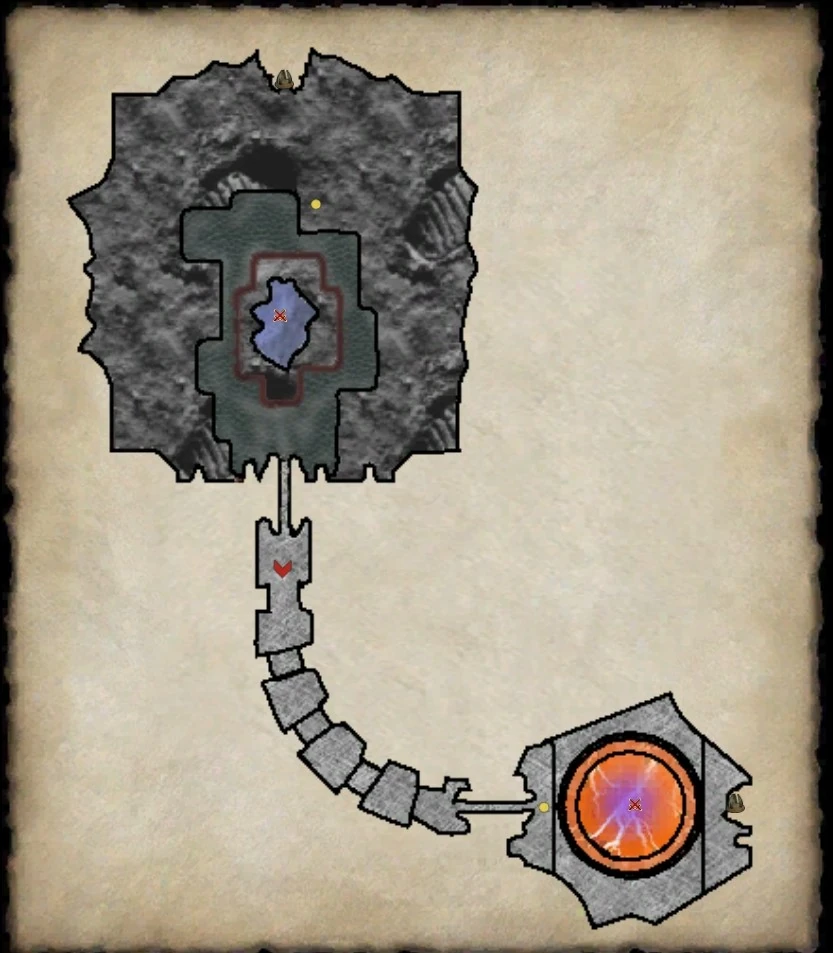
The second room - Proto-Ravager[]
Clear the room of the void ravagers. This will spawn Proto-Ravager in the lake in the middle of the room.
This mob drops crap loot and is not worth killing for the time and effort involved in getting him to spawn. I always skip him. Simply run into the room, harvest any easy to get to shineys, and then run into the other hallway at other end of room. If you invis and/or are careful on how you run through the room, you won't have any mobs on you when you reach the hallway connecting to the bouncy mob room. Some of the trash mobs can see invis, so pay attention to avoid needless fights/deaths. If you have mobs on you, simply FD them off or kill them just inside the hallway. Then run through the hallway to last set of trash mobs, fighting all mobs still on you at the spot where last set spawns, with back against the pillar. This will work for tanks and scouts. Mage and healer classes may have to kill the trash mobs as they go down the hallway.
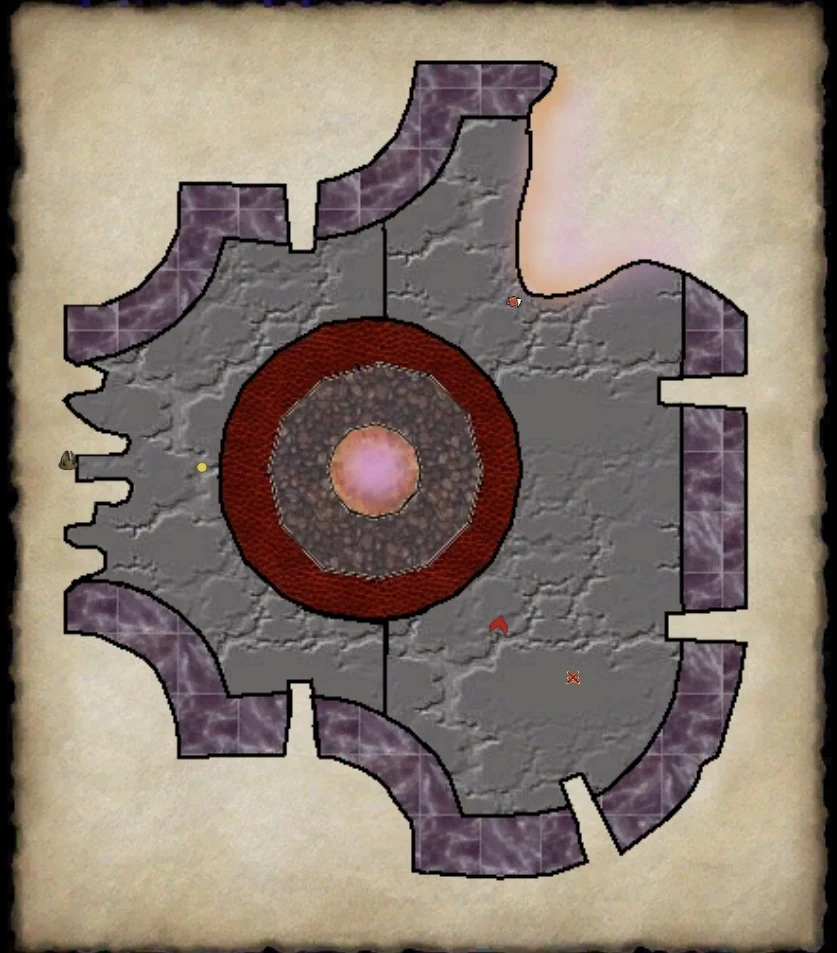
The third room - Kierax The Energy Wielder[]
This is where things get interesting. We encountered a shadow man named Kierax the Energy Wielder who taunted us by threatening to demonstrate his power. Unfortunately, for him, his power emanates from towers in the four corners of the room, near the ceiling. Energy orbs (they are very dark with black and yellow smoke trails) come out from openings in the four corners of the room and float slowly toward Kierax the Energy Wielder. Once he has absorbed enough of them he unleashes a powerful AOE attack that pretty much takes the entire group down to 5% from full health.
To deal with him, we learned we had to prevent him from absorbing those orbs. To do that, we assigned a few people to rush the room, running furiously towards the center. There is a swirling vortex of red energy with a blue energy swell floating above it. After leaping into the air, you will be caught up in the energy swell and lifted into the air, towards the ceiling.
Essentially, the strategy for this battle was to assign one (or two, to be safe - healers and tanks work well due to the lack of healing that's needed and having limited ranged attacks - the Boss doesn't have an attack other than the AOE that kills the entire group so healing is not needed too much) people to bounce up and down (without entering combat), focusing on grabbing the energy orbs before they get to Kierax the Energy Wielder. This is done by aiming your flying self at the orbs and flying through them. Be sure to have your camera zoomed all the way out and look straight down. (then its just up down left and right to get the orbs - like a regular platform game) It is important to land either in the very center to bounce back up or you can land on the side and then jump back into the center. Make sure you take some Dramamine first. The rest of the group stayed on solid ground and used ranged attacks to burn Kierax the Energy Wielder down.
If you miss an orb, your party will be severely weakened by his AOE. Most groups won't survive missing two times in a row. As long as your bouncers keep floating up and down, grabbing the orbs as they go, this battle is actually quite easy. You will be rewarded with around 13 plat for your efforts.
Just stage yourself in the hallway right before this mob. Look up so you can see the mob and the close proximity around him. Rush into his room, and run to the edge of the bouncy pit, but don't jump in. You're looking to barely get within spell casting range of him without falling through the floor or into the bouncy pit. Unleash your most devastating spells as quickly as possible on him. You should also be shooting him with ranged weapons the whole time. If your toon is a pet class, send pet in to attack the mob, BUT ONLY if you can kill him in 15 to 20 seconds. If it looks like a black blob is going to make it to him before you can kill him, simply run backwards, remembering to hit your jump button to jump up over the lip into the hallway to previous room. Run backwards down this hallway until you get to the other end of it. You will be safe from the mob's AOE at this point, and the mob won't reset, UNLESS YOU HAVE A PET UP. Now you simply watch the mob and his blob adds. When no blobs are close to him, run back into the room, shooting him with ranged weapons and spells until he dies and craps out your PHAT plat chest. So, a re-cap, don't fight him with a pet up, unless you're positive that you can kill him before the first blob reaches him. If you fight him with a pet, a blob gets to him, you run back into the far end of the hallway, then he will reset & you'll have to start the fight all over again. This is a very easy solo fight with DOV end geared toons. A great way to farm plat. My SK and coercer can both kill this guy with this strat within 15 seconds. Sure beats the hell out of jumping around in the pit and hoping you get all of the blobs and kill the named before he AOE's you to death. A much better strat for those of us who are bouncy challenged, and who don't want to share the plat chest with anybody.
Another strategy if you are soloing and your HP is higher than 27K: Would be simply range attack him by running the hallway towards him and hitting him then running back out of his range behind the wall... healing + putting up your defences then repeating the step until he is dead. Just got to be quick in order to avoid being hit twice.But What I did with my pally was shoot him, run out of range Shoot him,run out of range ect. until he is dead(About 3-9 arrows)
The fourth room - Executor Vark[]
The void pit houses Executor Vark. This is a standard tank and spank encounter and didn't take much thought.
This guy will hit you with a bunch of damage and a knockback as soon as you run into his room, most of the time. DON'T be SCARED! Just stay away from him after the initial damage he does to you. Go ahead and look for and harvest the one shiney in the room while the named mob spawns in the middle of the room. Don't harvest the shiney immediately if it's in the middle of the room, as this is a trap. Once you harvest your shiney, run over to where the named mob is doing his long-winded jawing with the other named NPC. Jump up onto the side wall area within spell and bow range of the named, putting your back against a wall. Simply wait for him to stop jawing with the other NPC, kill the other NPC, and turn attackable. Then simply pull him over to you with a ranged weapon or spell and spank his butt. He has a knockback which is negated by fighting him along the sidewall of the room. He frequently drops level 80 master spells and rarely a really cool looking white appearance bow with particle effects and crappy stats. You also earn AA exp and status points for killing him. So, despite having to sit through his long-winded speil, he's definitely worth killing and an easy kill.


